Mobile Passport Photo System Bundle - Preconfigured for US Passports
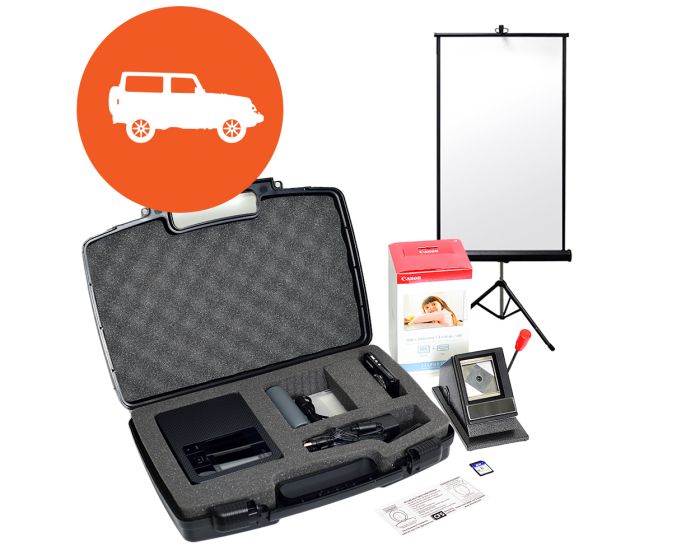
Print anywhere with this easy to use, mobile passport photo solution. bundle includes: 16 megapixel digital camera, clear photo composing guide decal, CP1500 digital photo printer (both preconfigured for quick & easy US passports), rechargeable battery for camera & printer, camera battery charger, mobile backdrop screen, tabletop cutter, printer carrying case, 8GB SD memory card, quick reference instruction sheet & a 108 pack of paper/print media (4x6"). Just point & shoot, insert the memory card into the battery-powered printer & you can print passport photos remotely!
![]()
Complete, STANDALONE system includes: Digital Photo Printer, 16 Megapixel Digital Camera, Portable/Freestanding Backdrop Screen, Foam-padded Printer Carrying Case, Battery For Printer, Tabletop Photo Cutter, Clear Photo Composing Guide Sticker, SD Memory Card, Battery/USB charging Cable, Custom Quick Reference Instruction Sheet & 108-Pack of Paper/Media (no software/computer needed) - all PRECONFIGURED to print US passports right out of the box!
Cut the cord with our new mobile passport photo solution. We've bundled our popular "pre-configured" passport photo system with an assortment of mobile accessories to meet your passport or ID photo needs outside the office or store. You can power your printer without plugging it into a wall and we've even thrown in a hard sheel/foam padded carrying case to hold your printer, power adapter/chargers, battery, print tray, media & more. You'll also get our Quick Reference Guide sheet with step-by-step photos created by our Product Specialists and a 108 pack of paper/ink media! This passport printing system is incredibly simple to use. Just take the picture and plug the SD memory card into the Passport/ID Photo Printer; on its built-in screen choose the photo, then click the Print button and then the OK button. Each 4x6 inch print takes only 47 seconds and comes out with 2 identical photos at 2 inches square, ready to cut. We even apply a clear decal on the camera's LCD screen with an outline of a head and shoulders to help you compose a perfect photo every time.
System Contents:
- PRE-CONFIGURED CP1500 Passport/ID Digital Photo Printer
- Canon Print Paper Media/Dye Sub Ink Ribbon Cartridge Pack - makes 108 4x6" prints
- 16 Megapixel Digital Camera
- Padded Printer Carrying Case
- Rechargeable Printer Battery
- Tabletop 2x2" Photo Cutter
- Portable, Freestanding Backdrop Screen
- Clear Shooting Guide Sticker on camera LCD screen
- 8 Gigabyte SD Memory Card
- Rechargeable Camera Battery + USB Charging Cable
- Printer Paper Tray
- Illustrated Quick Reference Guide - for easy instructuctions
| CFS Digital Passport Photo System Specifications | |
| Camera Resolution & Type | 16 Megapixel Point & Shoot |
| Viewfinder Style | 2.7 - 3" Digital Screen |
| Camera Flash | Built-in with Red Eye Reduction |
| Camera Internal Memory | None |
| Camera Memory Card Slot | 8 Gigabyte SD (card included) |
| Print Size | Pre-configured for 2" x 2" + various sizes up to borderless 4" x 6" |
| Sheet Size | 4" x 6" only |
| Print Speed | 47 seconds per sheet |
| Print Method | Dye Sublimation (near continuous tone) |
| Print Tray Capacity | 18 sheets |
| Operation Method | Built-in LCD Screen on Printer |
| Camera Connection Mode | None (SD memory card must be removed for ID/passport photos) |
| Input Media/Memory Card Types | Accepts SD Cards |
| Electrical | 110 volts |
| Printer Dimensions | 7.1"W x 5.4"D x 2.5"H |
| Printer Weight | 2.15 lbs. |
| Printer Warranty | 1 year defective parts & labor |
| Camera Warranty | 1 year defective parts |
- INCLUDES 1 BOX OF 108 SHEETS/INK RIBBONS!
What Comes With the Smartphone Passport Photo Printing System?
Check out this short video to see what is included in the Smartphone Passport Photo Printing System.
How To Use The Canon CP1300 Digital Passport System
Start by loading the ink ribbon cartridge. Note the notched groove and the arrow that shows the insertion direction. Slide it into the side of the printer until it clicks in place.
Next we’ll load paper into the tray and insert it into the front of the printer. Be sure to load no more that 18 sheets at a time.
Take your photos composed with the camera’s shooting guide on the screen.
Remove the SD memory card from the camera and load it into the small slot on the front of the printer.
Next we power the printer by pressing and holding the ON button.
CFS has taken the time to preconfigure the printer for US passport photos. Press the OK button...
Tips For Taking The Perfect Passport Photos
Tips for taking the perfect passport picture from Consular Affairs at the Department of State. More information is available at https://travel.state.gov/content/travel/en/passports/requirements/photos.html
Cleaning Your Printer
Maybe you’ve seen a paper size or paper jam error on your printer. A simple roller cleaning is often all that’s needed!
Start by removing the paper tray. Dust & paper fibers can easily build up on the 3 gray feed rollers located at the front of the printer. We’ve seen great results by just cleaning the rollers with your finger or thumb. You can also use warm soap and water (on a damp rag to clean them as well.Spin the rollers as you wipe them, making sure to wipe the entire surface. Replace the paper cartridge and try a print, chances are you’ll be printing like normal.
And that’s it for our quick tip on getting rid of paper feed errors!


